Japan travel tips for a 25 day stay
I vacationed in Japan from November 12-December 6, 2019. My sister will be studying abroad there next semester, so I gathered these tips based on my experience for her. Hopefully you will find it useful too! (:
 My Japan 2019 Trip
Tips for Jojo:
- Try to use credit card/Suica (recharged with a credit card) for everything. Use cash as a last resort! Get those credit card rewards points!
- Make glasses ASAP
- Read below for more details!
Airports 
If you can choose between flying into Haneda or Narita, fly into Haneda! It’s way closer and cheaper to get to central Tokyo from Haneda.
Getting to/from Haneda: Just use Google Maps and take a subway!
Getting to/from Narita: If you have to go from Narita and don’t want to activate your JR pass too early/deal with traffic of buses, I would recommend getting the Narita Express round trip tickets for 4070 JPY (if your trip is two weeks or shorter). If you’re not too worried about time, you can take a Keisei bus for 1000 JPY one way to Tokyo Station, which is the cheapest option I found. If you use Google Maps, you will also find a lot of other options and their prices.
JR Pass 
Do your own calculations to see if you save money by getting the JR Pass. These are the two websites I used:
- Japan Rail Pass Value Calculator
- Hyperdia (actual train ticket prices and times)
I bought my 7 day JR passes from this website because the price including cost of shipping was least expensive ($268/pass + $8 shipping). It seems like the prices on each website do fluctuate though, so please shop around. I received the vouchers quickly and had no problem exchanging them for the actual passes.
You have to order and receive the JR pass voucher in the mail BEFORE you head to Japan. After you arrive in Japan, you can exchange the voucher for the actual pass, and tell them which day you want to activate the pass.
Remember that the pass is only valid for consecutive days. So for example, if you get a 7 day pass and activate it on November 15, the last day you can use it is November 21.
Here are my rough estimates that helped me decide to get the 7 day JR pass: 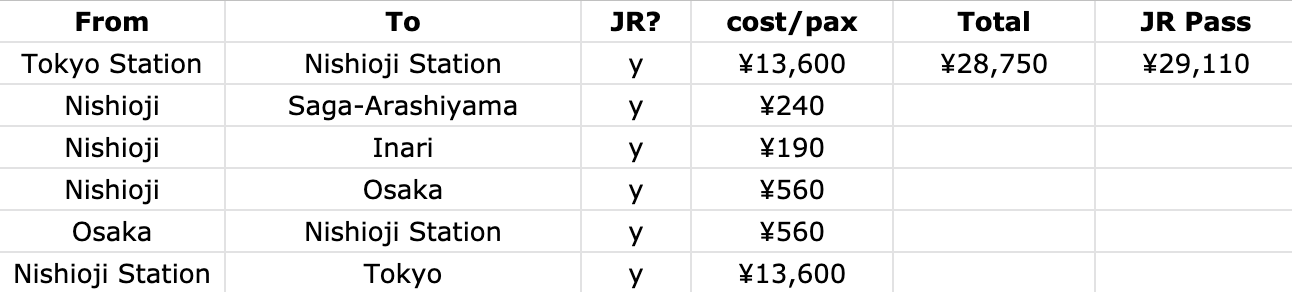
The bulk of the cost was taking the shinkansen (bullet train) between Tokyo and Kyoto. The estimates came out to be about $3 than the cost of the JR pass. I knew that I would probably be using the JR pass on the subway a lot more than I calculated, and the convenience of just showing the pass to the employee at the gate would be worth it for me.
I exchanged my vouchers in Tokyo Station at one of the JR East Travel Service Centers. They will need the passport of each person getting a pass. I also went ahead and reserved seats for Tokyo -> Kyoto and Kyoto -> Tokyo - I already knew which trains I wanted to take from Hyperdia, so I told the employee the train number and times (i.e. 12:33 PM SHINKANSEN HIKARI 513 Tokyo Station -> Kyoto Station 3:11 PM). Since I reserved early, I was also able to specify that I wanted to sit on the right side of the train on the way to Kyoto and on the left side of the train back to Tokyo to see Mt. Fuji! ![]()
I was able to use the JR pass for some subways, bullet trains, and a couple of buses. I did get confused when some bus stops had the JR sign on them, but when I tried to show the bus driver the pass, they rejected it and I still had to pay. The JR lines in Tokyo will have a ‘JR’ icon on the route in Google Maps.
I never tried the bullet train unreserved seating with the JR pass so I’m still not sure how that works.
Phone 
Get a SIM card or wifi egg. I went with a data-only SIM card, but if you’re traveling with multiple people that need wifi, it might be cheaper to get a wifi egg. I ordered this 30 day, 7 GB sim card from simcardgeek for 4980 JPY, but it seems like I received an unlimited data SIM card in the mail instead? Not complaining though. It worked perfectly for my 25 day trip! I ordered this about a month before my trip, and I put it in my phone right after my plane landed. Looking back after my trip, it might have been easier to get a SIM card that could also do text messaging, because some apps like JapanTaxi require a phone number and texting to set up. There are a lot of sim card/wifi eggs options depending on how long your stay is. I’m not sure what option is best for study abroad though, since that’s usually at least 4 months long.
Google Maps 
Wonderful for taking the subway! Not so great for buses - sometimes they’ll tell you to get on the wrong side of the road, or the bus stop will actually be a couple of blocks away. Google Maps also kept telling me the wrong side of the building when I was looking for certain shops.
Also, I recommend starring all the places you want to visit on Google Maps! That way when you’re in already in an area and see you starred something nearby, you can easily walk there!
Google Maps is not always correct for whether a place is open or not, so double check if you can! For example, we were able to go to the Osaka Expo Park on a Wednesday, even though Google Maps said it was closed (had to do a lot of googling to find out that it was open on Wednesdays during the autumn leaf season). It also told us some restaurants were open, when they were actually closed.
Google Translate
The camera translation feature was pretty useful, but could be highly inaccurate at times. The translation happens on the spot and keeps changing, so be sure to pause the translation if you want to read something long! I used this a lot while shopping.
![]()
Subways & Buses 

At almost every subway gate, there is a little booth where an employee is standing. I found the most efficient way to ask for directions was to usually go to the booth with Google Maps open on my phone, say “sumimasen” to get their attention, and show them the station that I was trying to get to (instead of asking them in English). I also did this sometimes to double check that I was at the correct gate for the bullet train, etc in huge, confusing stations like Tokyo Station. I also did this with bus drivers to make sure I was on the correct bus.
Transportation (and more!) Card: Suica (IC Card) 
Get a Suica card (does not expire), not Welcome Suica (it expires in 28 days and does not work with Apple Pay).
IMPORTANT NOTE: I actually had the option to create a virtual Suica in my Apple Wallet on my iPhone - I’m not sure if this is because I had a Japanese SIM card. But check your Apple Wallet when you’re in Japan to see if you have that option, because then you don’t have to buy the physical card and then register it, and you don’t have to deal with the deposit and refund either.
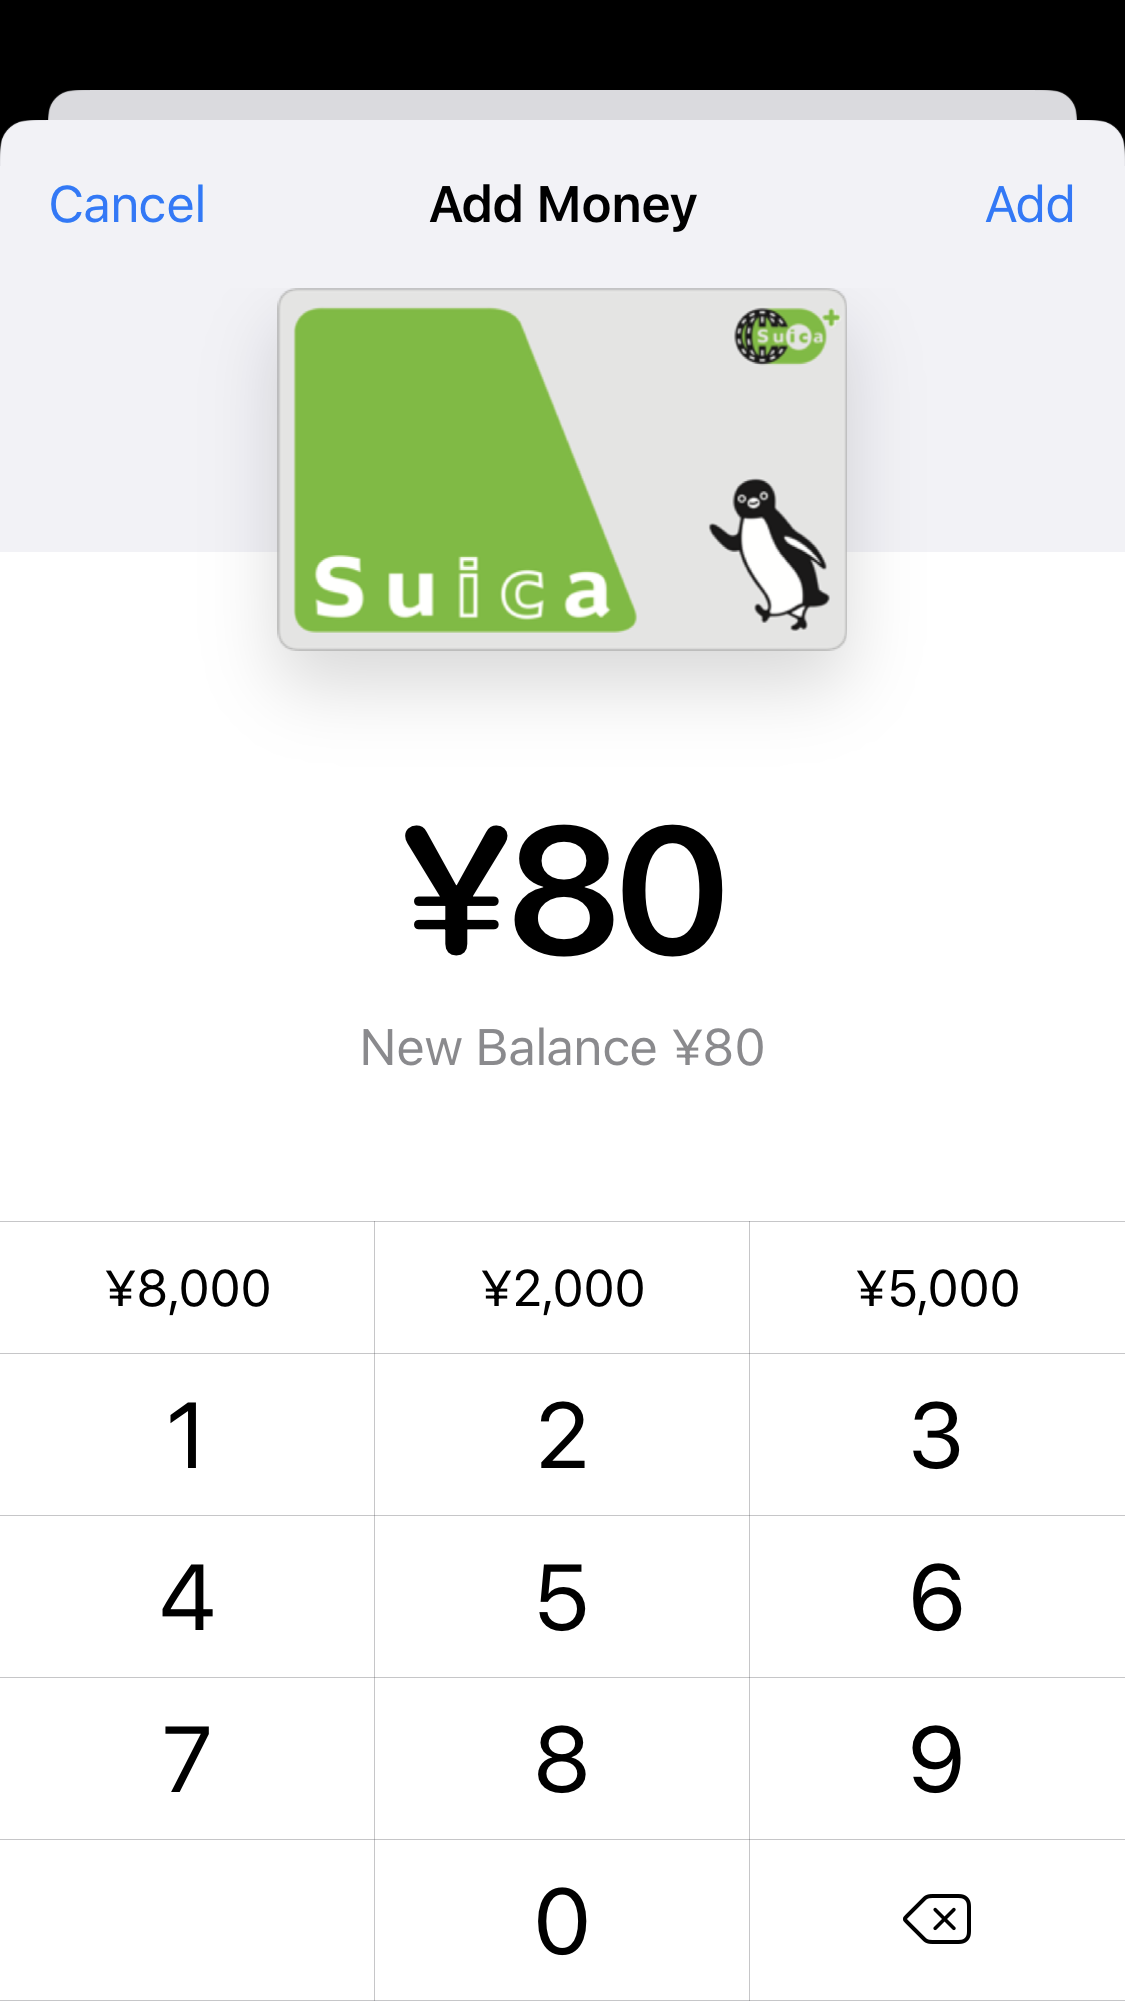
Set up your Suica with Apple Pay: (I tried this with my Welcome Suica, and it did not work). This is important because it I think this is the only way you can recharge your Suica card with a credit card instead of cash. This is also great because you can add a specific number of yen to your card, instead of the usual 1000 yen increments at IC card recharge machines (good for when you’re leaving Japan and don’t want to have leftover yen). For example, I used to Google Maps and saw that taking the train to the airport was 532 yen, so I added that specific amount to my Suica with my credit card through Apple Pay, and left Japan with no yen leftover!
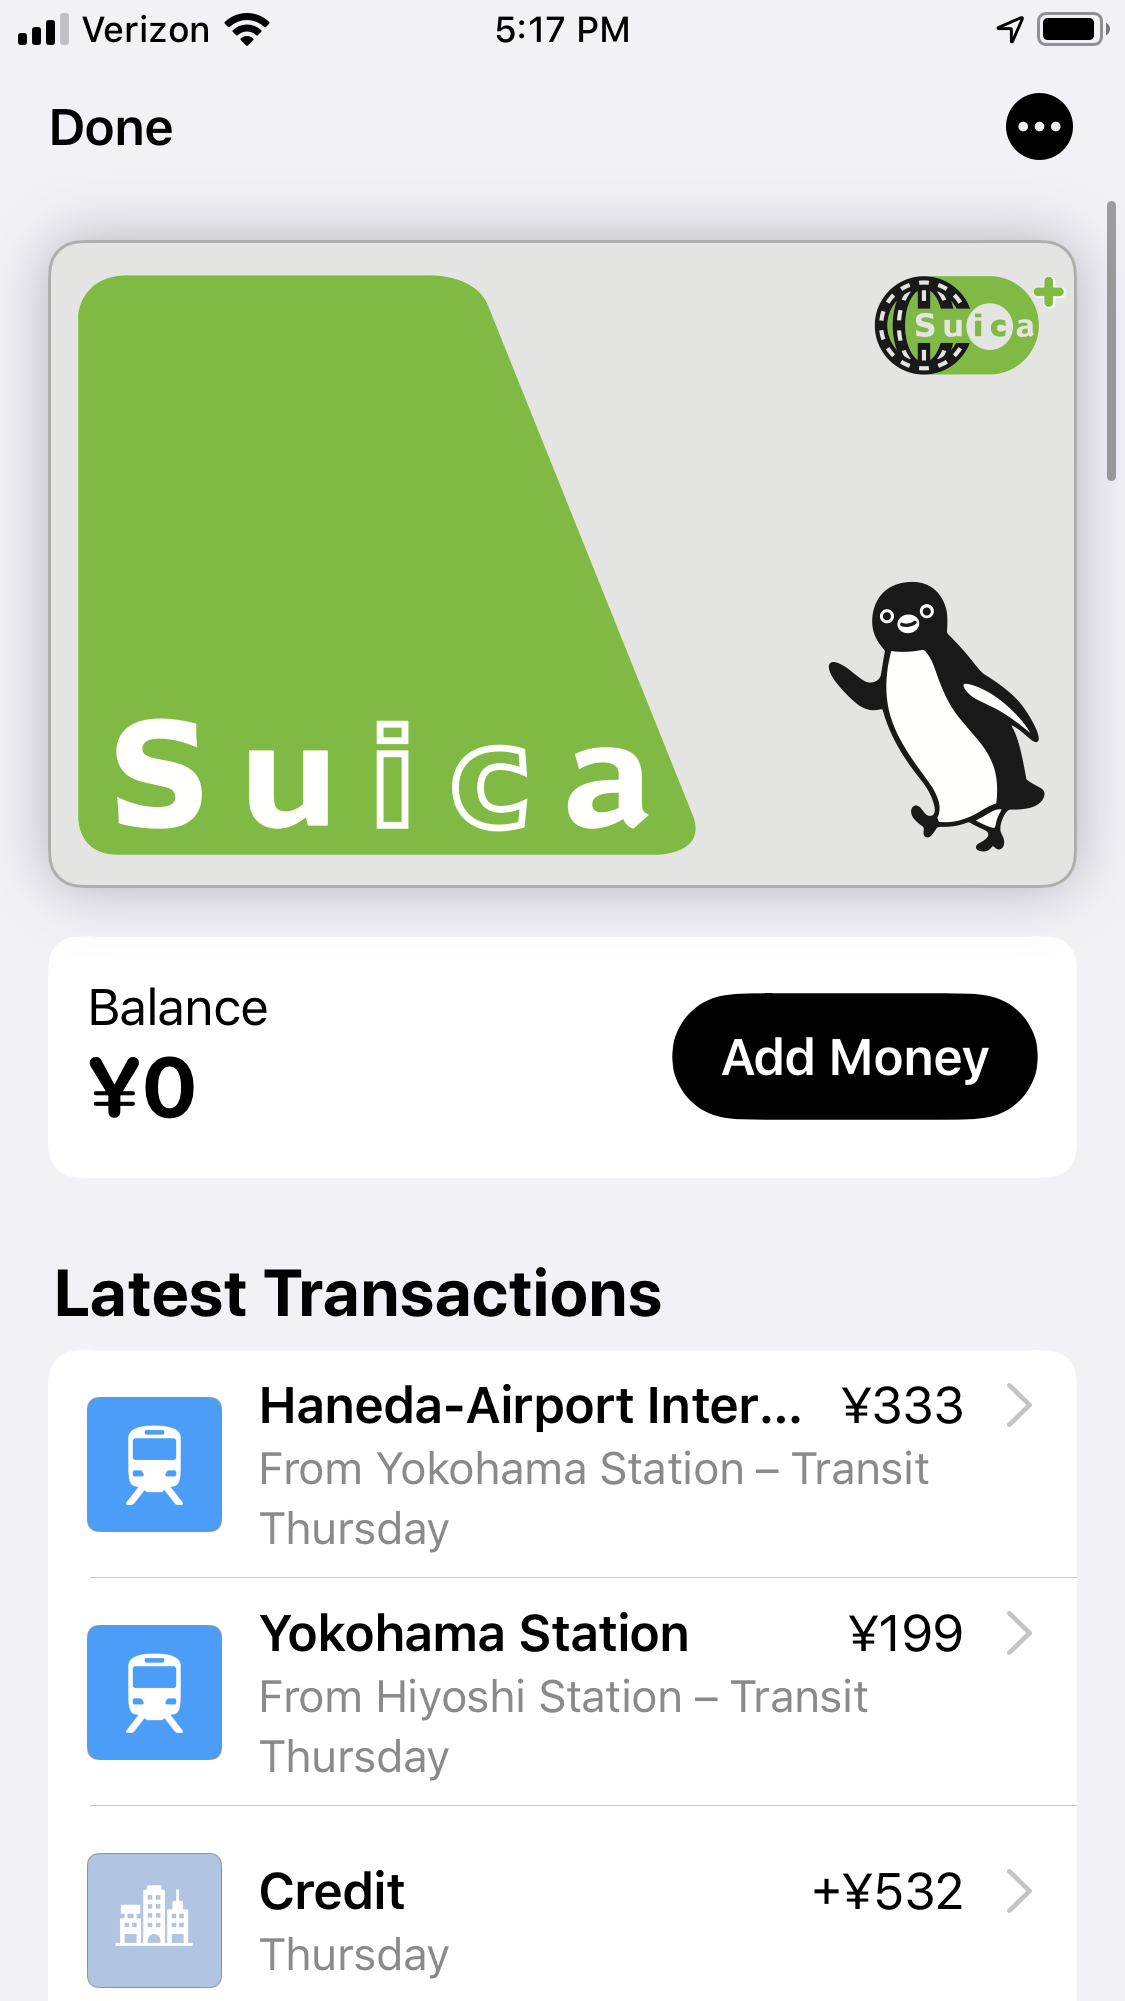
After setting up Suica through in Apple Pay and setting it up as my Express Transit card (see the Apple Pay link), I didn’t even need to unlock my phone to scan through subway ticket gates, on the bus, at convenience stores, etc. You can use Suica at many places - vending machines, restaurants, shops. Just look for the Suica/Pasmo/IC card logo, or you can just ask “Suica?” when paying, and the person will usually understand. I was even able to use Suica in Tokyo DisneySea to pay for food and stuff in the gift shops! This is especially great if you have a travel rewards credit card with no foreign transaction fees, like Chase Sapphire Preferred. Recharging Suica with my credit card counted as travel, so I got 2X points for that. Then I used Suica to pay at a convenience store, which would have only given me 1X points if I used my credit card.
Money 
![]() Credit cards: Get a credit card with no foreign transaction fees, and be sure to set up your travel notification on the credit card! I was able to use my VISA credit card in most places that I went to in Tokyo and Osaka. Not as many in Kyoto, especially if you are visiting places like temples. Also, if you are given the option to choose between being charged in JPY or USD, ALWAYS choose JPY (unless you’re using a card with foreign transaction fees, but please don’t lol), because the exchange rate your credit card company gives you will be much better.
Credit cards: Get a credit card with no foreign transaction fees, and be sure to set up your travel notification on the credit card! I was able to use my VISA credit card in most places that I went to in Tokyo and Osaka. Not as many in Kyoto, especially if you are visiting places like temples. Also, if you are given the option to choose between being charged in JPY or USD, ALWAYS choose JPY (unless you’re using a card with foreign transaction fees, but please don’t lol), because the exchange rate your credit card company gives you will be much better.
![]() Cash: I highly recommend getting a debit card that refunds ATM fees, like the Schwab High Yield Investors Checking Account. When I needed to withdraw cash, I just went to any 7 Eleven and used my debit card at the ATM. Minimum withdrawal was 10,000 yen, and Schwab refunded me the ATM withdrawal fees at the end of the month.
Cash: I highly recommend getting a debit card that refunds ATM fees, like the Schwab High Yield Investors Checking Account. When I needed to withdraw cash, I just went to any 7 Eleven and used my debit card at the ATM. Minimum withdrawal was 10,000 yen, and Schwab refunded me the ATM withdrawal fees at the end of the month.
The exchange rates with these two methods are much better than if you brought cash in USD and exchanged it to JPY.
But seriously, my favorite way to pay was by scanning Suica on my phone since it was the most convenient (see Suica section). And Apple Wallet even shows the history of each transaction, so if you track your expenses, it can help you match up your Japanese receipts to what you bought.
Laundry 
Consider staying in an airbnb or somewhere with a washing machine! There are usually no dryers though, so it might take a couple of days for something thick to dry. Bringing dry fit stuff would be a good idea, since those dry quickly!
Passport & Tax-Free Shopping 
Bring your passport everywhere! A lot of shops offer tax-free shopping for tourists if you spend over 5000 JPY. You can ask the cashier or any employee if you can get your purchase tax-free, and sometimes there is a special check-out line for tax-free shopping.
Here is a tax-free shopping guide. I did regret getting some snacks tax-free, because they were sealed in a special bag that I wasn’t allowed to open until I left Japan. No one actually checked at the airport though. And I’m not sure how they would check either, since I put them in my checked bag.
Stuff I got tax-free:
- candy and snacks from Don Quijote
- backpack purse from Anello
- glasses from JINS
Toilets 

I sure do miss Japanese bathrooms. Their toilets are the best. I watched Simon and Martina’s video guide on them before my trip!
If you are out and about and need to use the bathroom, most convenience stores have a public restroom you can use even if you don’t buy anything.
Souvenirs 
Don Quijote is a good place to buy different flavors of Kit Kats, but I was able to find every thing else I bought there for a lot cheaper at the grocery store (instant noodles, cookies, etc). Would highly recommend visiting a local grocery store for other food/snack souvenirs! Also, Tokyo Banana was cheaper in the duty-free shops at Haneda Airport than anywhere else I saw them in Tokyo.
JINS - making glasses 
JINS or Zoff are good places to make glasses, and you can get them in as little as 30 minutes. I went to the JINS flagship in Shibuya. I would recommend this one because they are used to dealing with foreigners! Prescription glasses start at 5000 JPY - this includes a free vision test if you don’t have a prescription!
- I asked an employee to help me pick out frames. She didn’t really speak English, so we used Google Translate to communicate! The first question she asked was if I wanted to try out a new frame shape. I told her yes, and that my budget was 8000 JPY or lower. I tried on a lot of frames and she also gave her opinion on whether or not they fit my face well.
- After picking out my frames, I told the employee that I needed a vision test (free). We went to the second floor, and I waited for about 5 minutes before I got a vision test in English. After the vision test, I tried on lenses and decided the ones that helped me see best were too strong, so we kept adjusting the prescription to be weaker until I felt more comfortable.
- The employee walked me through all the options for my glasses. If you have really poor eyesight and need high index lenses, the thinner lenses are still free, but you would have to wait a week to pick up your glasses. I also decided to add the 25% blue light protection, which was an extra 5000 JPY.
- I paid 130,000 JPY total: 8000 for the glasses + 5000 for the blue light protection. I got it tax-free with my passport.
- I picked up my new glasses 30 minutes later. The employee asked me to try them on so she could make some adjustments for a better fit.
- They have a great lens exchange policy - you can change the lenses two times within the first 6 months if you want a different prescription, or if you want to add/remove the blue light protection. If I had chosen to remove the blue light protection, they would have refunded me the 5000 JPY.
- Make glasses as soon as possible! Like the first day or two of your trip, so if you decide you want to change the lenses, you’ll have time. Also, depending on the options you pick, you might have to wait a week before you can pick up your glasses.
Connie Feng BLOG · TRAVEL · JAPAN